Hosting Setup
For hosting your website we will be using the services of Cloudways to provide you with your very own dedicated virtual server. Don’t worry, you don’t need to know anything about servers. Cloudways look after this for you. To get started, follow the steps below
01. Go to the Cloudways website
02. Click on the ‘Start Free’ in the top-right corner to create your account. Once created, check your inbox and verify your email address before continuing.
03. You should now be on the Application & Server Details screen where it will be asking questions about the server that you would like to setup. I’ve recorded a video that walks through thee process below. If you prefer to follow written instructions, I’ve detailed these below the video.
WordPress: Version 6.0 (clean with no cloudways Optimisations). By the time you are reading this version 6.0 is the latest, but there may be a more recent version when you reach this point.
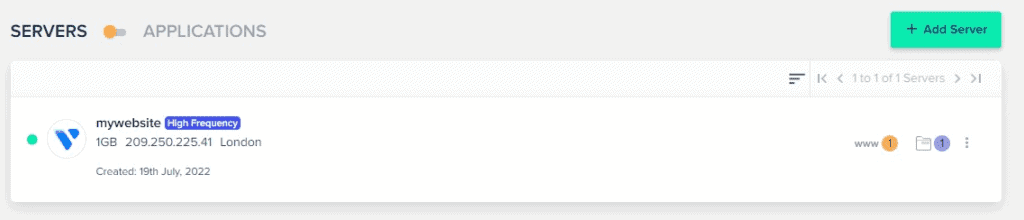
Name Your Managed App: Give it a friendly name. I tend to use the website name (i.e. mysite.com).
Name Your Managed Server: You can call the server anything you like, ‘VacationRentalWebsite’ for example.
Name your Project: Use your web address again for the project name so it can be easily identified.
Service Provider: For the choice of service provider, choose the ‘Vultr’ box
Server Size: Choose ‘High Frequency’
Sliding Scale: Move the slider to the far left to highlight the ‘1GB’. At the time of writing this is $13 per month.
Location: Cloudways have servers in datacentres all over the world. To provide the fastest experience to your guests, try to choose a datacentre that is geographically as close as possible to the majority of your guests. For example, if I had a villa in Spain and 80% of my guests came from the UK, I would choose the London data centre.
04. When you’re done, click on the ‘Launch Now’ button
After 10-15 minutes your server will have been deployed and is now ready for use. The next step is to add your payment details for when the trial expires. To do this, you can either click on the ‘Upgrade my account’ button that appears in the banner near the top, or click on the ‘Account’ icon at the top right, choose ‘Account’ and then click on ‘Credit card’ in the left menu. Here is a short video to demonstrate
That’s everything you need to do right now to get your web hosting account setup. The next step will be for us to configure our new website, so let’s jump back to the main guide and move on to the next section.